DIY Home Security System Installation Guide (Step-by-Step)
By Kalkee Editorial Staff
Updated July 4, 2026 • Verified by Industry Experts
The Rise of DIY Home Security
For decades, home security required expensive professional installations, long-term contracts, and high monthly monitoring fees. Today, wireless technology and smart home hubs allow homeowners and renters to build and install high-quality security networks themselves. A diy home security system is affordable, customizable, and easy to configure. This step-by-step guide explains how to plan, install, and test your system.
DIY systems also allow you to expand your network over time. Start with a basic kit of door sensors and a keypad, then add motion sensors, outdoor cameras, and smart smoke detectors as your budget allows, building a custom security network for your home. The flexibility of these systems means you are not locked into a rigid setup; you can prioritize the most vulnerable entry points first and gradually layer in more protection. For instance, if you live on the ground floor of an apartment building, you might focus on window sensors and a doorbell camera before investing in a full motion detector array. This modular approach not only spreads out the cost but also lets you learn the quirks of each component without feeling overwhelmed. Many modern DIY kits come with user-friendly mobile apps that guide you through pairing devices, adjusting sensitivity levels, and setting custom schedules. The result is a security solution that fits your lifestyle, whether you are a tech enthusiast who wants to automate everything or someone who simply wants peace of mind without the hassle of a salesperson.
Another advantage of DIY home security is the ability to integrate with other smart home devices. You can connect your security system to smart lights that turn on when a sensor is triggered, or to a smart lock that automatically disarms the alarm when you enter your code. This creates a cohesive ecosystem that enhances both convenience and safety. For example, if a motion sensor detects movement in your backyard at night, your outdoor lights can illuminate the area while your phone receives an alert. These integrations are often straightforward to set up through platforms like Amazon Alexa, Google Assistant, or Apple HomeKit, making your home smarter without requiring a professional installer. If you are looking for the best diy security system with smart home integration, many top-rated kits now offer native support for these ecosystems. As you build out your system, you will find that the initial investment pays off quickly in terms of reduced anxiety and increased awareness of what is happening around your property.

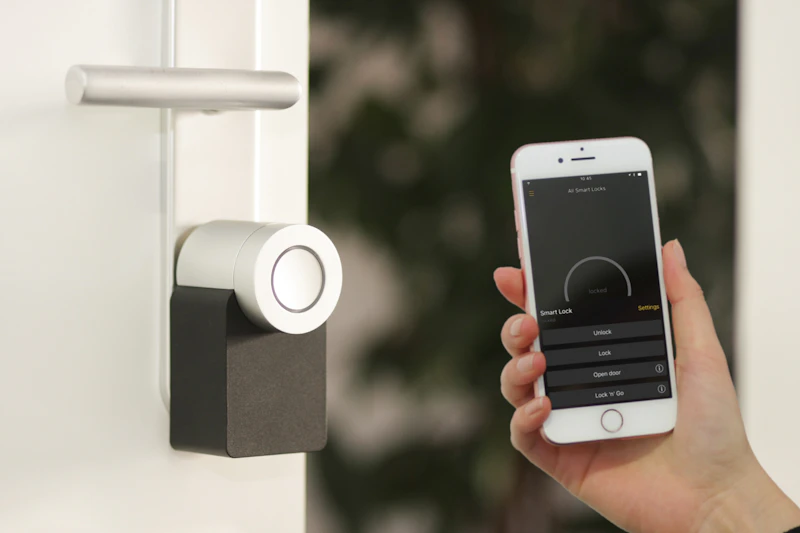
Step-by-Step Security Installation Guide
Follow these instructions to set up your wireless security system. Taking the time to plan your layout before you start will save you from having to reposition devices later. Walk through your home and identify all potential entry points, including windows that are hidden from street view or doors that lead to attached garages. Make a list of the sensors you will need, and check that your Wi-Fi signal is strong in every location where you plan to install a device. If you have a large home, consider using a mesh Wi-Fi system or a range extender to ensure reliable communication between the base station and all sensors. This is a crucial part of any diy home security system installation guide, as connectivity issues can undermine even the best hardware.
1. Position the Central Base Station
Place the base station in a central location in your home, close to your Wi-Fi router. The base station is the brain of your system, communicating with all sensors and sounding the siren when triggered. It should be placed on a flat surface, such as a shelf or table, and kept away from metal objects or large appliances that could interfere with the wireless signal. Some base stations also include a backup battery, so ensure it is fully charged before you begin pairing devices. If your system uses a cellular backup for monitoring, verify that the base station has good cellular reception in its chosen spot. A little planning here will prevent connectivity issues down the road.
2. Install Door and Window Entry Sensors
Mount entry sensors on all exterior doors and ground-floor windows. Clean the door and frame surface, apply the adhesive backing, and align the sensor and magnet so they are within 0.5 inches of each other when closed. For sliding doors, you may need to use a different type of sensor or mount the magnet on the track. Test the alignment by closing the door and checking that the sensor indicates a closed circuit in the app. If the gap is too wide, the sensor may not trigger properly. For windows that are rarely opened, you can also use a recessed sensor that is drilled into the frame for a more discreet look. Remember to label each sensor in the app with its location, such as "Front Door" or "Living Room Window," so you know exactly which entry point is triggered during an alarm. These steps are essential for anyone learning how to install a home security system yourself.
3. Mount Motion Detectors
Position motion sensors in high-traffic hallways or main entry points. Mount them 6 to 7 feet off the ground in corners for maximum room coverage. Adjust pet-sensitivity settings to prevent false alarms from cats or dogs. Most motion sensors use passive infrared technology, which detects changes in heat. To avoid nuisance triggers, do not place them near heating vents, radiators, or windows that receive direct sunlight. If you have pets, choose a sensor with a pet-immune rating for animals up to a certain weight, typically 40 to 80 pounds. You can also create "no-go" zones in the app to ignore specific areas of the room. For open-concept homes, a single motion sensor in a central hallway can cover multiple entry points, reducing the number of devices you need to install. When comparing options, many users find that cheap diy home security systems still offer reliable motion detection without breaking the bank.
4. Configure the Keypad and Sirens
Mount the keypad near your main entryway for easy arming and disarming. Connect auxiliary sirens in hallways or bedrooms to ensure the alarm can be heard throughout the house during an emergency. The keypad should be placed at a height that is comfortable for all household members, typically around 4 to 5 feet from the floor. If you have children, consider using a keypad that requires a code to disarm, rather than a simple button. Auxiliary sirens can be plugged into any outlet and will sound simultaneously with the base station, making it harder for an intruder to ignore. Some systems also allow you to set a delay before the siren activates, giving you time to disarm the system when you enter. Test the volume of the sirens to ensure they are loud enough to wake you from a deep sleep. For those seeking the best self monitored home security system, a well-placed keypad and siren setup is critical for effective self-monitoring.
Testing and Monitoring Your DIY System
Once hardware is installed, run a system test. Put the alarm in test mode and trigger each sensor to confirm the base station receives the signal. Walk through every door and window, and move in front of each motion detector. Check that the app logs each event with the correct sensor name and timestamp. If any sensor fails to trigger, check the battery level, re-pair the device, or adjust its position. It is also a good idea to test the siren and any auxiliary alerts, such as push notifications or email alerts, to ensure they reach your phone quickly. Perform this test at least once a month to catch any issues early, especially after changing the batteries or updating the system firmware. Many people wonder are diy home security systems worth it, and consistent testing is one way to ensure your investment pays off.
Decide between self-monitoring (receiving alerts on your phone and calling police yourself) or subscribing to professional 24/7 monitoring plans ($15 to $30/month) for automated emergency dispatch. Self-monitoring is cost-effective and gives you full control, but it requires you to be available and responsive at all times. If you travel frequently or work long hours, professional monitoring provides an extra layer of security by ensuring that authorities are notified even if you cannot answer your phone. Many DIY systems offer flexible monitoring plans that you can activate or cancel at any time without long-term contracts. Some also include video verification, where the monitoring center can view live camera feeds to confirm an intrusion before dispatching police. Weigh the pros and cons based on your lifestyle and budget. For most homeowners, a hybrid approach works well: self-monitor during the day when you are home, and enable professional monitoring at night or while on vacation. If you are looking for the best wireless home security system no monthly fee, self-monitoring with a reliable camera setup is an excellent option. Whichever option you choose, remember that a security system is only effective if you use it consistently. Make arming the alarm a habit, just like locking the front door, and you will enjoy the peace of mind that comes with knowing your home is protected.